
Stickers may not add any horsepower to your dirt bike but may be as important as some aftermarket add-ons. A clean, presentable ride representing your sponsors goes a long way. Even though you are only riding for fun, graphics protect the plastic and keep your bike always look new. Let us go through the basics which essentially cover all the mx stickers you need to know and how to take care of.
It is important to keep some things in mind during the installation process in order to ensure your graphics look good for a long time. See these tips for the easiest way to install. We have outlined for you. Like everything else, patience and practice go a long way.
Plastic prep: first you are going to want to wonder whether you are going to use your graphics with brand new plastic or if you want to apply it for what is on the bike.
Used plastic: if applicable, remove all old decals. You can use a heat gun to warm the graphics (let the plastic not get too hot) for easy removal. This enables the adhesive to lift the pull much easier. Once all the decals have been removed, remove residual goo stickers with the contact cleaner or rub alcohol. Once the sticker goo is removed, remove soap and water from the plastic and allow to dry completely.
New plastic: use either contact cleaner or soft cloth rubber for the cleaning of any new oil residue plastic. When plastic is produced in the molds, this oil is used to prevent plastic from sticking and stuck. It is much like a spray cooking and frying pot. Once the plastic wash with soap and water has been cleaned up.
Please note that clean plastic is very important, so the graphics stick well and you can live their whole lives without premature peeling! Graphs that are installed directly on fuel tanks may also bubble or slightly decelerate. This is completely normal and inevitable because of the fuel vapor that flows into plastic fuel tanks.
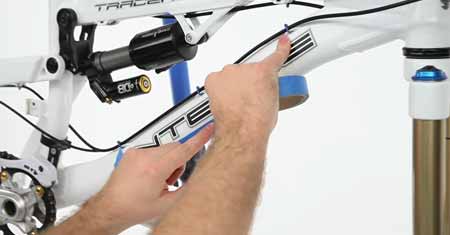
Installation: start by aligning the piece with your plastics and pull back the corner of the paper backrest. If the placement looks good, the backing paper is removed slowly while the graphics are pressed onto plastics. Using your thumb or plastic edging device, ensure that air bubbles are removed when graphics are positioned.
This is where it helps to take things slowly. If you get a few bubbles, try backing the plastic off a little and applying it again. Heating the graph will make it even more flexible when installed on today’s bikes in the more curved sections of plastic.
Examine the graph and see how it lays before the backup is removed. A little anticipation goes a long way!
Use decal holes and edges in key places. Then tack it down in the center and push the graphic from the center so that the air pockets are not trapped.
Do not push too hard until you know where you want it. It is all right to peel it gently and try again but be careful not to stretch it out. When the heat and pressure are applied too early, it can be too early to undo if the graph is not properly aligned.
Squeegees work but scratches are left. If you do not mind that, then you go ahead. If you like to take a squeegee but do not want any scratches, get a sticky velcro and stick the soft part around the squeegee tip. We like to use a microfiber rag combination and only our thumbs. Find what works. Find what works for you.